You don’t have to make any major changes to upgrade your home. Sometimes, adding small and simple touches is all you need to boost your curb appeal. Ditch the hassle of a major renovation and consider adding a permanent roof decoration instead. In this blog, we’ll cover all the types of roof decorations you can choose from to bring your home to the next level.
Why Should You Invest in Roof Decorations?
Most often, when people bring up roof decorations, they’re talking about the Christmas season. People love to spruce up their home exterior with all kinds of lights and other decors. But you don’t have to wait for the holidays to boost your curb appeal. You can do it year-round with roof decorations that will last.
Curb appeal is the visual representation of your home. More simply put, it’s how your home looks to people outside. You can boost your curb appeal by doing a number of things such as manicuring your landscape, purchasing a new garage door, or in this case, adding a structure to your roof.
Studies have shown that increasing your curb appeal is associated with an increase in your house’s value or price. Investing in decor for the exterior of your home adds value to your property and may be just the thing to bring your home design together.
Traditional Rooftop Decorations
If you’re looking for permanent rooftop decorations, there are some traditional pieces you could use. These structures are made to bring people’s focus to your home and make an average roof stand apart from the rest.
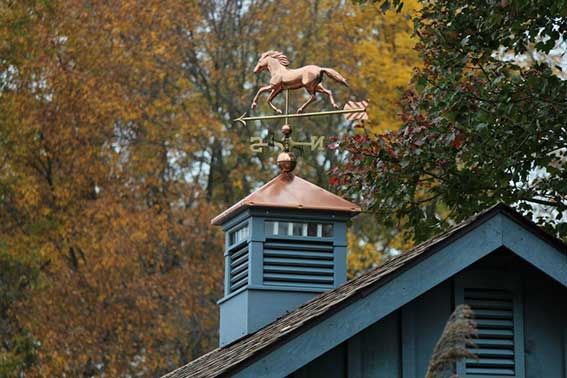
While each decoration can be placed by itself, it can also be combined to decorate your roof, for instance, you could choose to have a cupola with a weathervane or a finial. Let’s take a closer look at the rooftop decorations to choose from so you can figure out what will work best for your home.
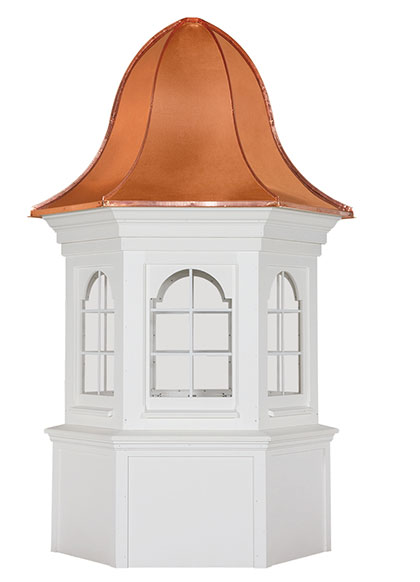
Cupolas
What is a cupola? This structure is a hollow frame that sits on the top of your roof. Oftentimes, it can work as a base for other roof decorations, (like a light or weathervane) but it looks just as nice when installed alone.
Traditionally, cupolas are hexagonal or square-shaped, but they come in a variety of sizes, styles, and colors. They’re smaller than your roof, but add a focal point for people looking at the outside of your home.
There are two main types of cupolas:
- Functional
- Decorative
If you’re looking for a functional cupola, it will help with ventilation throughout your home. A decorative cupola is used solely for the purpose of adding curb appeal to your home.
Cupolas can be made of almost any material, but most often are copper, wooden, or vinyl. The size and style of your cupola will depend on how big or small your house is, and the type of overall exterior design or function you’re trying to obtain.
Finials
Sometimes known as spires, finials are a more simple decorative piece for your roof. They are decorative caps that are placed on the points or ends of a roof. Finials were traditionally used to emphasize the top of a dome, spire, or tower.
They can be made of any material, but the most common are copper finials. These come in an assortment of sizes and styles and can be placed on top of cupolas. They work to bring a unique and elegant addition to your roof without overpowering the entire home.
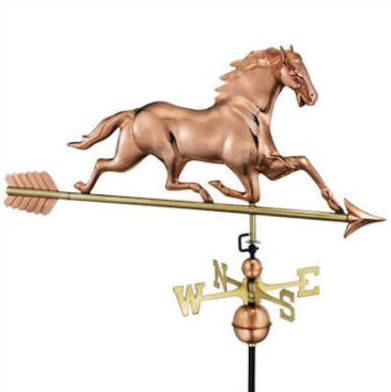
Weathervanes
Also known as a wind vane or weathercock, these pointers were historically used to show which direction the wind was blowing. They can be made from a variety of materials, but the most common are copper weathervanes.
There are countless types and lots of styles you can look at when picking out a weathervane, but typically there are four main styles to choose from:
- Simple-Swell Bodied Style– The weathervane sculpture piece has two shaped sides which are soldered together. Details are kept at a minimum and the sculpture pieces are hollow inside.
- Silhouette Style– The sculpture piece is flat with an emphasis being on the silhouette. There is very little texturing or shaping.
- Full-Bodied Style– These three-dimensional pieces are the most complex. They are based on true proportions on a reduced scale.
- Detailed-Swell Bodied– Similar to the simple-swell bodied style, they have two shaped sides but consist of many individual pieces that are shaped, contoured, and soldered together.
Installing Rooftop Decorations
Once you’ve decided which rooftop decorations are right for your home, it’s time to install them. If you’re planning on installing your structure by yourself, you’ll want to follow a few steps to make sure you’re doing it correctly and safely.
Below we’ve provided some steps for installing each specific structure, as well as a sizing guide to help you decide how big or small your decoration should be.
Cupola Installation
- Prepare the roof. If your cupola is being used for decorative purposes only, there is no preparation needed. If your cupola will be used to help with ventilation or accessibility you will need to cut an opening in the roof that is at least 12” smaller than the cupola base. Make sure the main roofing material protrudes into the cupola up to the roof opening.
- Determine your roof pitch. Roof pitch is the number of inches the roof rises vertically for every 12” it extends horizontally. Screw 2 boards together and straddle the roof with each board. Make sure each side is flat against the roof and the center is at the center of the peak. Mark the boards and apply a screw. This will be your cutting template.
- Mark the cupola base. Draw a centerline on the cupola base. Using your cutting template, make a line from each corner to the centerline. This will be your cutting line. Your base should now be ready to cut. Tip: Start cuts at the corners and end at the center.
- Position. Position pieces of 2x4s on sides to be flat against the inside walls of the cupola base. Screw them to the roof.
- Mounting and assembly. Attach the base to the 2x4s. Secure the base to the roof and use silicone caulk to seal the sides of the base sections. Leave an area in the 2 lower edges unsealed to allow any water to drain. Attach the mid-section to the base, and the top to the mid-section using screws. Apply silicone caulk to all exposed screw heads.
Weathervane Installation
- Check nuts and bolts. Make sure all nuts and bolts that hold the weathervane together are clean and easy to screw and unscrew.
- Align. Before installing, align the weathervane so that each arrow is pointing in the correct direction.
- Locate your rafters. Use a tape measure to determine the center of your roof. From the inside, drill a pilot hole and put a metal rod through to the outside. Make sure to stud the beam you’ll be trying to fasten to.
- Secure the weathervane. Use 3 ½” of galvanized wood screws or self-driving lag screws to secure the weathervane to the roof over the shingles.
Finial Installation
- Anchor the finial. Determine if it’s possible to drill a ¾” hole into solid wood in the peak of your roof for the bottom of the finial’s post. Drill a plumb hole into the peak. Smaller finials should be 6” to 9” in depth. Larger finials should be 10” to 12” in depth.
- Determine the finial’s post. Measure the post below the finial and deduct 1” to 2”, which will give you the depth of that finial’s post. The finial’s bottom-most ornament should be approximately 1” to 2” above the roof peak.
- Caulking and mounting. Place adhesive silicone caulking inside the hole in the roof. Press the post into the caulked hole. Make sure the joint where the post goes into the roof is well caulked before finishing.
Sizing Guidelines
The most popular formula to use when finding the correct cupola size is: 1” to 1 ½” of cupola base per foot of the roofline. Steeper roof pitches or multiple levels will usually need a larger scale cupola, whereas low pitched roofs or single stories will be better with smaller scale cupolas.
When installing a weathervane or finial on top of your cupola, make sure the length and width of weathervanes and finials don’t exceed the widest part of the cupola.
Take Your Home To The Next Level
Check out our wide variety of rooftop decorations today and find the perfect decorative addition to your home.